Pen Photography - Part III
|
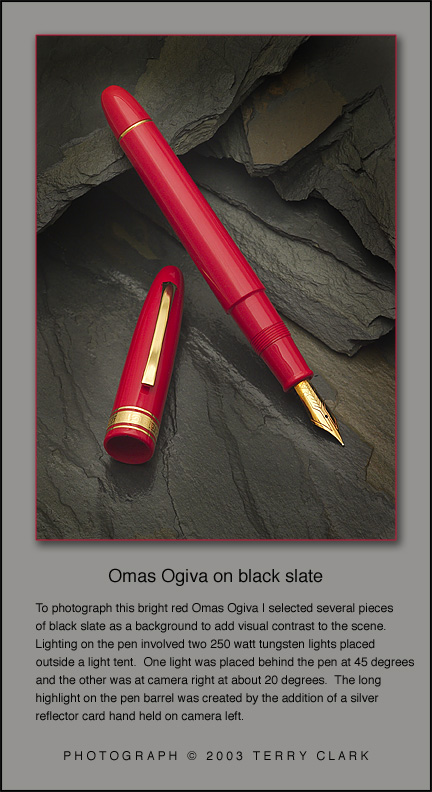
Last Time, we covered light cones, light tents, reflectors and the basic "record shot". So let’s begin... The beauty shot The beauty shot is just that -- a picture designed and styled to bring the beauty and romance of the pen to the forefront. Beauty sells, just look at the ads from many pen companies. It also makes for great wall art in your home, office or den. The lighting is similar to the standard record shot (soft light) but rather than place the pen on a plain background go to the next level and find something more interesting -- art paper, fabric, stone, rock, marble, barn wood, sheet metal, leather or anything else you can imagine! I’ve seen some Japanese pens photographed successfully on rice or bamboo. The background you choose should either (1) add contrast or texture or (2) relate somehow to the pen either by material, surface texture or style. One word of caution, when positioning pens on any surface other than smooth, soft material always, always use Kneaded Rubber as both cushion and adhesive. A little dab will do you, but if you don’t you risk damaging your pen. This point should seem quite obvious, and is to anyone who has shot pens, but I make it here for the record. And as I recently posted, don’t use products such as Silly Putty or that blue tacky stuff to adhere your pens to backgrounds. These products contain chemicals that can potentially damage, or at the very least, stain metal. Maybe you’ll be lucky and have no problems, but I’ve personally experienced staining on a gold cap when I used the blue stuff (once) and would hate to have others suffer the same problem. Exposure The best way to accurately calculate exposure is to first let your camera read what is known as a “gray card.” This card is white on one side and 18% gray on the other. Simply place the gray side in the same lighting as your pen scene and take a manual exposure reading while filling the frame with the card. Make note of the reading, set your camera to those settings and shoot the pen, presto, perfect exposure! The gray card is a product distributed by Kodak which is 18% gray on one side and white on the other. It’s an industry standard for exposure and color balance. You can find these at most camera specialty retail stores. Online they are available from B&H Photo (http://www.bhphotovideo.com/) and Calumet Photo (http://www.calumet.com).White BalanceWhite balance is critical to good photos of pens. Without properly rendering the true colors of your pen your Big Red may look more like a big blue or big green! Many cameras today have an automatic color balance setting. While this may work, in my experience it’s hit and miss, mostly miss. The best way to set the proper color (white) balance is to turn to your trusty gray card. Please note -- because almost every camera is different in exactly what steps you need to take to manually set a white balance you’ll need to consult your instruction manual for the proper procedure. Basically you do the same thing as if you were setting the exposure using the gray card only this time you go one step further and select custom white balance. It is best to use the gray side of the card rather than the white side because this is true neutral and how the camera is calibrated from the factory. Exposure does count so be sure to find the right exposure BEFORE setting the white balance. The evil of flare Thankfully there are simple and effective ways to eliminate most lens flare. The first thing you need is a lens hood. If your camera does not have one, simply make one out of a rolled piece of black paper -- make sure you roll the paper into a cone, not just a tube or you may vignette part of the picture at the edges. Once you have a cone cut it to the right size to fit over your lens without interfering with your zoom. Tape it in place and presto, instant lens hood made cheap! You can vary the size of the hood depending on your working distance by cutting it down with scissors. Obviously when you’re shooting in macro mode you will need less hood otherwise it may knock into the pen if you’re too close. The second solution is to mask off the subject (your pen) with black paper or cards. I use black construction paper or black mount board because it’s cheap, easily cut to the shape I need and can be found at any arts and craft store. In practice you just lay down the black paper around your pen keeping about an inch or two of the white showing on all sides. This will effectively eliminate unwanted light from bouncing back into your lens and therefore give you sharper images with more vibrant and true colors. Another interesting thing that happens when you use black masking is negative reflections on your pen, i.e. the black line on the edge of the pen. A black reflection increases visual contrast and helps separate pen from background. By changing the distance of the black mask you will change the size of the reflection -- just don’t get it so close you can’t later crop out the mask! Once you try it a few times you will find the spot where it works best for you and can repeat it anytime you want that effect.So now we know how to find the right exposure, the correct color balance, how to achieve the best light and use reflectors to add or subtract light. All we need now is to practice, practice and practice some more! Happy shooting!! Terry Clark has been a professional
photographer for more than 25 years.
|